Official Walkthrough
Hello and welcome to the official walkthrough of Riddlewood Manor. We hope this walkthrough will help you find your way as you embark on your journey the manor's haunted halls. If you can’t seem to find the solution to the task in hand or you’re experiencing any problem, you can leave us a message or join our Discord server and head over to our support channel for help.
SPOILER WARNING - GAME SPOILERS AHEAD
Jump to:
CONTROLS
-
Use your mouse for point-and-click interactions. At the bottom of the screen, you’ll find your inventory, where you can select and use items.
-
Use the arrow keys or A / D keys to turn left and right.
-
Hold the left mouse button to freely control the camera.
-
Use the scroll wheel to zoom in and out, making it easier to capture dynamic, cinematic shots.
-
Press M to open map
1. Forest Clearing
You’ve been thrown into the forest outside the manor. Take a look around and notice the monks praying for your success.
First try: open the gate and head up to the manor.
When you stand in front of the door, try to open it. It's locked. Ring the bell, and you’ll discover that an evil spirit
bursts from the door and kills you. The end. Try again?
Second try: Now you’re wiser, ready to face the evil within the manor.
-
Click on the monks and collect these items: harvest, a match, and a holy egg.
-
Behind you, you’ll find a bucket and a cow. Take the bucket and milk the cow.
-
Head back to the gate, open it, and approach the manor.
-
On your left is a crate. Fill it with the harvest.
-
Place the holy egg on the straw and click it again.
-
A mischievous dragon will hatch from the egg and, of course, start crying.
-
Give the dragon the milk. You’ll be rewarded with a candle.
-
Place the candle on the candle holder near the door.
-
Use the match to light it.
Now you’re protected. Ring the bell again. This time, when the door opens, the evil spirit will be purified, and you’ll be free to enter.
2. Entrance Hall
Open the first letter and read it. You’ll discover the connection between Margaret Riddlewood and the number 6. Remember that.
On your left, there’s a shelf with a pair of scissors, take them. Also, take the match from the coat. If you turn and see the door outside, click it and a ghost will slam it shut in your face. Haha.
Turn left again to face the old clock. Open it and you’ll find a wooden tile you can collect. Click on the staircase to go upstairs. You’re now facing the Riddlewood family portrait, above it, you’ll find another wooden tile. To your right, click the picture that looks like a wooden tile—it will fall, giving you a third wooden tile.
Turn right again to face the curtains, if you open them, symbols will appear on the family portrait behind you. Interesting. Take a note of that.
To the left of the portrait, there’s a door tied shut with a string. Use the scissors to cut it open.
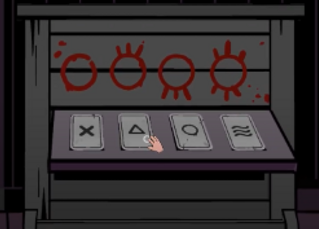
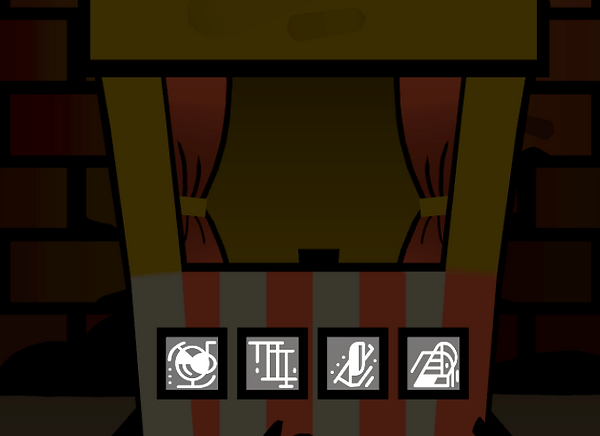
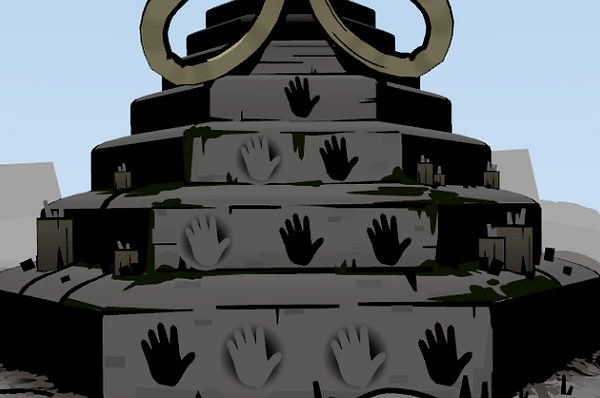
Welcome to Emily’s Playroom. In front of you is a hand-shaped puzzle, the solution is to draw a pentagram. But don’t overthink it; you’ll only get a note that’s just a hint for much later in the game.
Collect the Two train cars and four cards hidden around the room. You can place them on the shelf that’s on the same wall as the door back to the entrance hall.
But in what order should the cards be placed?
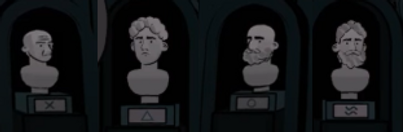
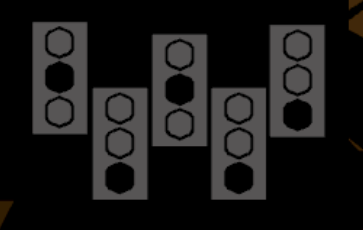
The solution lies in the symbols on the statues in the entrance hall—lines above a circle mean “hair” and lines below a circle mean “beard.”
When you solve it, a hidden drawer will open and you’ll find the fourth wooden tile and a toy train engine.
Go downstairs and place all four wooden tiles on the floating table. It will crash to the floor, revealing a letter. Read it to discover the connection between William Riddlewood and the number 4.
Return to the playroom. On the stage are toy train tracks, place the two train cars and the engine, then start it. Emily’s ghost will appear briefly, and the smoke from the engine will form the number 3.
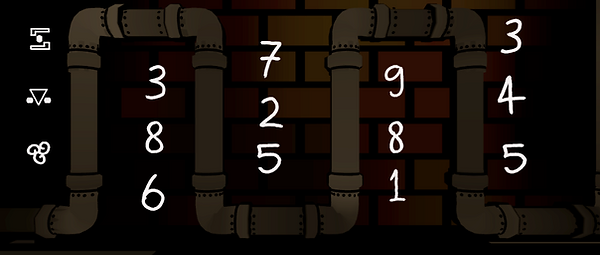
Now look to your left at the mysterious cabinet with a lever, there are three symbols here matching the ones on the family portrait, along with numbers. Using the connection between each family member and their symbol, you can assign the numbers you’ve discovered to create the correct code: 436.
Pull the lever to get the skull with a candle. Place the skull on the altar and light the candle. You’ve summoned a demon! The demon will enter the doll, Suzie, bringing her to life. She will leave the room. follow her downstairs. Behind one of the statues is a red cloud. click it to topple the statue and reveal a red key You can use it to unlock the Dining Room.
3. Dining AREA
Now you’re in the dining room. You can now speak to William, who is sitting in front of you. He’ll ask you to be useful and prepare breakfast. Time to get to work.
First, on your left is a cabinet you can open to take three matches.
Behind you is a door to the pantry. Inside, you’ll find the gas valve. Turn the red handle, light the gas, and… KA-BOOM! you’ll explode.
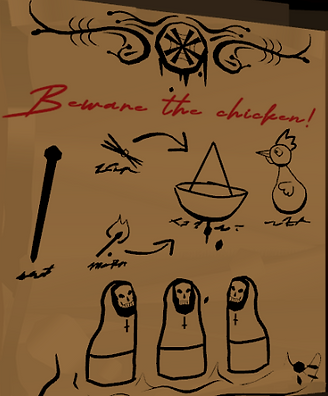
Time to start over, and maybe this time, pay attention to the warning sign near the stove.
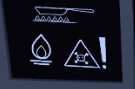
Start this room again - collect the three matches again, and take note of the code that appears when you open the cabinet, it’s in a 3x3 grid.

Go to the kitchen and open the stove connected to the gas. There, you can enter the code, and the light will change from red to green. Now you can turn the red valve and light the gas without blowing up.
Look around the room for a clean frying pan and place it on the stove.
Take the frying pan and place it on the fire. To the left of the stove, you’ll find a picture with the recipe for breakfast… two eggs and bacon.
Use the handle behind you to open the way down to the pantry.
There - Take grain from the barrel in front of you.Take the knob next to it. In the sealed barrel, you’ll find the mischievous dragon again, he’ll give you a candle. By the wine wall, you’ll find a saw you can take.
In the wine rack, there’s a minigame: connect four bottles in a row before the AI does. Tip: Try creating a row of three bottles with open spaces on both sides so the AI can’t block your fourth. Winning will reveal a locked door.
If you go upstairs and check the drawer missing a handle, you can now attach the knob and open it to get another candle.
Go back down to the pantry and look at the candle holder, you can place both candles and light them. The darkness will disappear, revealing a pig’s head. Take it.
Return to the dining room and give the grain to the chicken. It will eat it and lay an egg.
Go back to the kitchen, use the saw to open the cage containing the other egg, and collect it.
Place both eggs on the frying pan, and use the pig’s head on the meat grinder to get bacon for the pan. Take the finished breakfast to William, and he’ll give you a key. Go back to the pantry and open the locked door.
4. DUNGEON
Click on Suzie the doll to take the stone disk. She’ll come to life and try to attack you, but if you click her again, the light will go out and she’ll run away.
Move on to the next room, open the door, and you’ll see a monster’s mouth waiting to eat you. Feel free to click it and get eaten. On your next try, you might think twice before doing so.
Collect the stone disk and continue to the next room. On the left, there’s a barrel. Click it and a demon will pop out, giving you another stone disk.
Open the door next to the barrel to enter another room. Here you’ll find the third stone disk. On the wall, there’s a slot for all three disks. Placing them will start a puzzle, rotate the stone rings to form the correct complete pattern. You’ll receive a stone head. Take it.
You can now exit, but before you do, note that if you close the exit door, you’ll find a color code:
Green, Purple, Yellow, Purple, Green.
In the room with the alchemy station, you’ll find a chest you can open to get a key. Return to the first room and use the key to open a chest, a bat will fly out and scare you, and you’ll find half a skull.
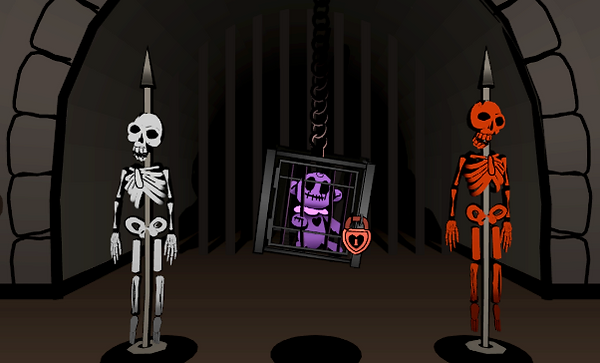
Now it’s time to solve the skeleton puzzle. Move the skeleton parts so you create it on the spear on the right and give it the missing half-skull. In return, it will give you a glass bottle, which you can place on the alchemy station in the adjacent room. Create the potion using the color code you saw earlier: Green, Purple, Yellow, Purple, Green.
Take the finished potion back to the first room, on the altar facing the three skeletons, place the stone head and pour the potion over it. Three symbols will appear above the skeletons.
This next puzzle is trickier:
-
In the room with the candles, you’ll see lit torches displaying symbols. Some may be lit and some unlit
-
If you return to previous rooms, open the monster door and the two chests , all the torches will light up, revealing the symbols on the torch wall.
-
These symbols in the last room will now form the four-symbol code.
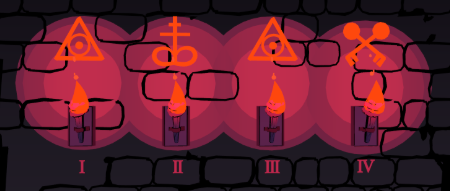
Return to the skeletons and click them in this order: Middle, Left, Middle, Right.
The correct code will give you a black heart key. Use it to free the teddy bear, and you’ll receive a black heart.
5. Guest Lounge
You’ve returned to the forest clearing, but this time you can go straight back to the house and enter.
When you enter the main lobby, don’t head to the kitchen! Look instead at the statue to the left of the door. It’s surrounded by evil energy. Click the statue to topple it. Take the blue key and head upstairs. Unlock the door to the Guest Lounge and go inside.
If you check the map, you’ll see that from the Guest Lounge you can exit into three different rooms: The Satellite Room, Mom’s room, and The Garden. There’s a puzzle to open each one of the doors and once you enter one of them there’s no turning back (doors are slammed behind you in the manor if the room is unsolved). When you get back to the lounge again you’ll need to solve the other puzzles and go to the other rooms.
But first, let’s do what is needed to get to the upper floor of the guest lounge.
Open the cabinet and take the extension cord.
Look to the left, above the sofa, you’ll see the first equation: Gnome + Gnome = 4. Makes perfect sense… remember it.
Flip over the cushion on the armchair to find a vacuum nozzle.
Now turn toward the wall with rows of pictures. Here you’ll find a minigame that starts off easy but quickly becomes wicked:
-
Mark your character and move forward one picture at a time.
-
Take the key, go to the door, and move to the next stage.
In the second stage, a ghost will appear on the board. Every time you move, the ghost moves too. The ghost will flee in a random direction unless it’s next to your character, in that case it will eat you and you’ll have to restart the stage. It’s best to let the ghost wander away, then grab the key and head for the door, dodging it as needed.
The third stage is much tougher, it has two ghosts. Here, a bit of luck will help, because sometimes you’ll have no choice but to die and try again. After a few attempts and careful strategy, you’ll make it to the door.
Winning the third stage lowers a staircase leading to the Library.
Above the fireplace, you’ll see another equation: Demon + Gnome = Skull. Remember this too.
Near the metal door, you’ll find a cabinet, open it to get the vacuum hose. Now look at the vacuum cleaner, attach the hose, the nozzle, and the extension cord, then turn it on. The ghost will be sucked in. Now you can read the book that’s left on the armchair.
Now, when you pick up the book, there’s a split in the puzzle, and each one of the solutions will take you to another room.
To open the Satellite Room: read through the book to the end of it —where you’ll find the equation:
Gnome + Demon + Skull = 14.
With all three equations, you can now deduce the values.
-
Gnome = 2
-
Demon = 5
-
Skull = 7
Enter the solution into the mechanism by the metal door and use the lever. You can now go up to the Satellite Room.
To open Mom’s room; read the book and look at this page
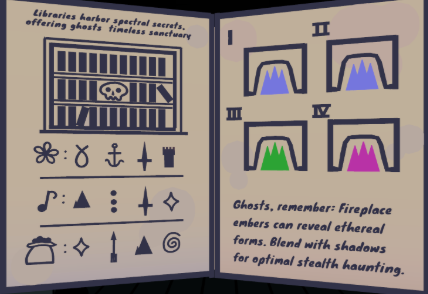
The symbols on the down-left are matching symbols on the books behind you. Select the four symbols that are just like the bottom one (rhombus, arrow, mountain, spiral)
The library will spin and reveal three bags of powder. You can use the spoon from your inventory to pick up colored powder and sprinkle it in the fireplace. You’ll need to do it in the same order from the right page above: Blue, Blue, Green, Purple. Doing so in the right order will give you a violin.
Click on the button at the right up corner of the rotating library. Now choose the books with the symbols that match the music note symbol (mountain, three dots, sword, rhombus) the library will rotate to show a statue of a serious musician. Give it the violin and the violin bow. The curtain will open and reveal the code in roman numerals: 6, 1, 2, 3
Go downstairs and look at the page on the piano, it will teach you basic music theory. Now you know that in the C major scale 6, 1, 2, 3, equals to : Am, C, Dm, Em. Play this sequence of chords on the piano and you will receive a music sheet. Go upstarts and use the music sheet on the locked door, it will open it and now you can go into Mom’s room
* Make sure you take the musical note trophy from above the fireplace before you enter this room.
To open The Garden: Choose the books with these symbols to rotate the library
You’ll see a wall with a grid of buttons, recreate the pattern that you can find on a paper hidden under one of the sofa cushions
You will receive a flower key that will open the elevator downstairs, use if to get to The Garden.
6. Satellite Room
This room is not an easy one to solve. So… good luck? Well, here’s how to do it, pay attention.
Take the fork and the green key.
Open the window and pull the lever to power up the satellite. You can now press the various buttons to move the star map, but where should it point?
On the wall to your left, you’ll see a wall of advanced equipment. In the center is a printer with two notes on top. Click them for a closer look, you’ll see a symbol that resembles two cabinets next to the large computer.
Near those cabinets, you’ll see rows of stripes with dots, these indicate the button press sequence to unlock them:
-
Top cabinet code: Left, Left, Right, Left, Right.
-
Bottom cabinet code: Up, Down, Up, Up, Down.
Inside, you’ll find the pink key and printer ink. Also note that opening the cabinets reveals two symbols.


Input these two symbols into the rows of buttons on the computer and you’ll locate the satellite. But if you try to press the transmit button it won’t help just yet.
Go back to the printer and pour the ink to turn it on. On its screen, you’ll see a graph icon, click it to cycle between three different icons: Graph, Creature in a Jar, and Diamond.
On the note hanging from the device to the left, you’ll find equations that connect celestial objects to items. From this, it’s clear the satellite is linked to the graph.
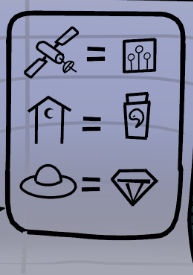
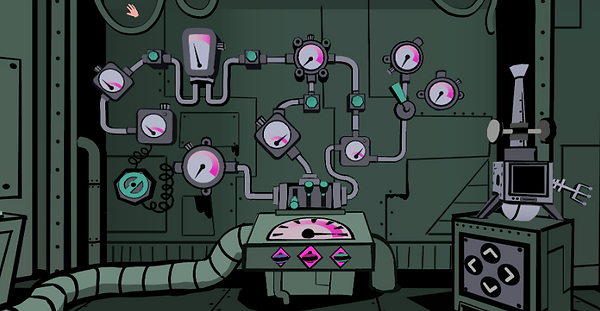
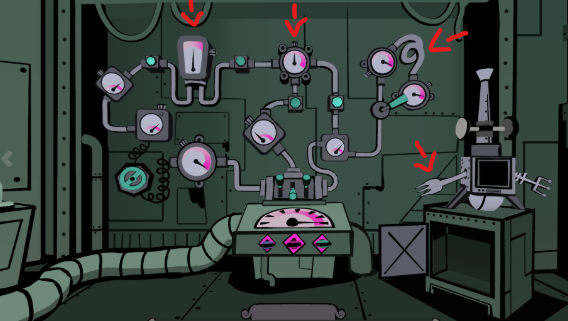
Press the Print button when the graph icon shows to get the following diagram:
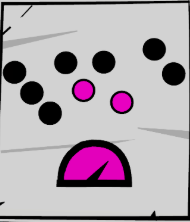
This indicated the dial wall. What you need to do it -
-
Collect the blue key and turn to the dial wall.
-
Use all three keys to activate the power flow.
-
Adjust the switches to match the diagram.
-
When power is flowing and the dial rises, the circle is pink.
-
When power is off, it’s black.
-
Important: You must match the diagram exactly, or it won’t work. Once complete, the dial wall should look like this:
Now turn back to the computer displaying the satellite and press Transmit. You’ll receive a slide with the graph.
Go to the overhead projector, insert the slide, and pull down the screen. Turn the projector on to reveal the code: COW.
Go to the equipment wall—where the letters are—and enter this code. You’ll get the following two symbols:

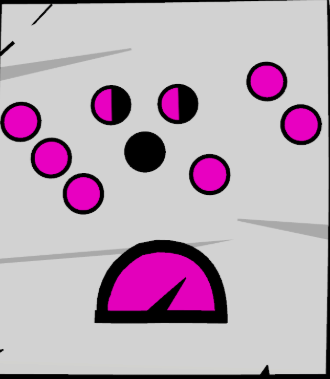
Input these into the computer to see the space bathroom. Based on the note with the celestial-to-item equations, you know you need the creature in a jar. Switch the printer display to that icon and print the diagram.
-
Adjust the switches to match the diagram.
-
When power is flowing and the dial rises, the circle is pink.
-
When power is off, it’s black.
-
Important: You must match the diagram exactly, or it won’t work. Once complete, the dial wall should look like this:
Press Transmit to receive an alien fetus.
Place it in the water tank to the right of the printer—you’ll receive two more symbols.
Enter these into the computer to display a spaceship. From the equations, you already know that a spaceship will give you a diamond. Print the relevant diagram for the diamond.
To configure this one on the dial wall, note two key things:
-
The two center dials should get only half of the electrical power and point upwards.
-
The right dial needs power, so you’ll have to add a wire.
To find the wire, insert the fork into the spinning electrical device to the right of the dial wall, this will give you a code. Enter it into the safe below to get the cable, then use it to power the right dial.
If you’ve done everything correctly, the dial wall should look like this:
Press Transmit to collect the green diamond.
The room will go dark, and an alien will appear on the computer screen. Words in an alien language will appear, each click translates a word. Once fully translated, you’ll be helpless as the alien abducts you into space.
7. Mom's Room
Shhh… Be quiet. Mom is sleeping…
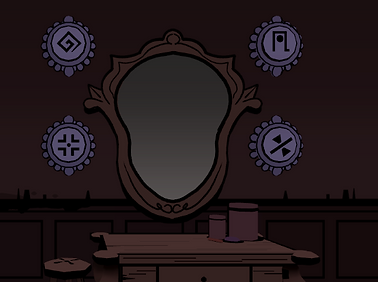
Take the tissue from the right side of the bed. Turn around to face the mirror and use the tissue to wipe it clean. Now, when you click on it, you’ll see a constellation.
To your right is a table with crystals. When you move the crystals between the different slots on the table, you’ll notice the stars in the mirror shift as well.
What you need to do is arrange the crystals so the constellation forms a mirror image of what you see in the reflection.
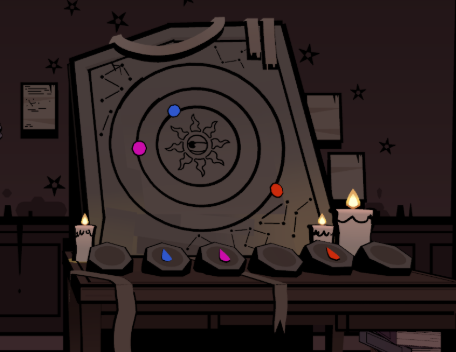
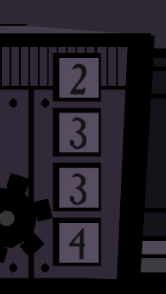
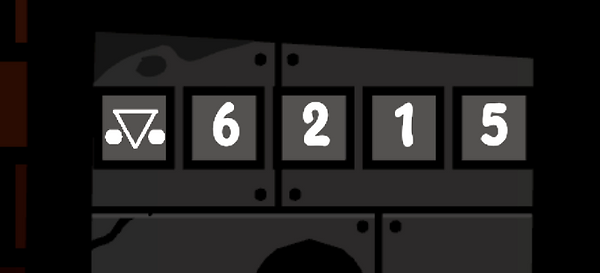
If you’ve placed the crystals correctly, clicking on the mirror will no longer show the stars, instead, it will reveal a mirrored code: 2, 3, 3, 4.
Now look at the portrait of Margaret playing the piano. In the empty space beneath her, place the musical note trophy. The haunted painting will come to life, fall down, and reveal a sliding puzzle where you swap tiles to complete the image of a demon.
Solving this puzzle rewards you with a blue diamond.
* If you entered the room without the musical note trophy in your inventory, don’t worry, you can still solve the room and progress. But later in the game, when you need the blue diamond. At that point, grab the trophy from the fireplace in the Guest Lounge, re-enter the room, and this time you’ll be able to claim the blue diamond.
Enter the bathroom and click on the trash bin. A wet piece of paper will pop out, you can dry it using the hair dryer to get a music sheet. Click on the sink to overflow it and collect a bar of soap.
Don’t hesitate to click on the toilet for a quick scare, a ghost will jump out at you! BOO!
Now look toward the bathtub. When you click it, three bubbles will appear one after another. You’ll need to click them in the exact order they appeared. If you succeed, five bubbles will appear, again, click them in the correct sequence. Complete this challenge, and you’ll receive a key.
Head back to the bedroom and insert the dried music sheet into the gramophone. (It only works if you dried it with the hair dryer earlier.) Turn the gramophone on. The noise will wake Margaret, who will force you to turn it off. Speak to her again, and she’ll ask you to fetch her dress.
Use the key to unlock the wardrobe next to the crystal table. Inside, collect the dirty dress and a string. But Margaret won’t accept a dirty dress! Time for your laundry duty. Return to the bathroom and stand in front of the washing machine. Open the door, put the dress inside, and close it. Place the soap in the top-left compartment and start the wash cycle.
Now you have a wet dress. Put the dress back into the washing machine (or leave it there if you never removed it). Switch the top middle button from Wash to Dry, then run the machine again.
The dress will come out dry… but still not suitable for Margaret, because it’s full of wrinkles. But it’s OK, you know how to iron a dress, right?
To the right of the bathtub, you’ll spot an iron and an ironing board, quite the perfect place for them. To use the iron, first open the cabinet and enter the code you saw in the mirror.
This unlocks the lever that lowers the ironing board. Place the wrinkled dress on it and press on the iron. If you now iron the dress… the board will snap, the iron will fall into the bathtub, and you’ll be electrocuted to death!
If that happens just try again
Remember: from the cabinet you can collect a string. Use it to secure the ironing board from above. Now you can safely iron the dress without getting shocked to death. Success!
Take the freshly pressed dress and bring it to Margaret. She’ll ask you to turn around and not peek while she changes. Once you turn back, you’ll be rewarded with a rather lovely encounter.
Afterward, collect the candle, go to the bathroom and place it in the compartment beside the toilet. Flush, and the demon will appear—only to be mesmerized by the candle’s flame and explode. The holy blast will tear a hole in the wall, through which you’ll tumble down into the sewer.
8. Sewerage
Collect the candle, the match, and the tube of glue.
Use the glue to fix the four leaks in the room. After you do that, you can use the lever on the central console to open the way to three rooms. Note the symbols next to each pipe leading to a different room—we’ll use them to tell the rooms apart: the Ghost King Room, the Magician's Room, and the Music Box Room. The room you’re in now is the Central Room.
Go to the Ghost King Room and you’ll see a candlestick beside him. Place the candle there and light it to get rid of the disgusting ghost.
Hmm… maybe it’ll work better next time. At least you can pick up another match from the Central Room whenever you need it.
Either way, there’s more to do in the Ghost King Room: you can pick up a dead rat and drop it into the toxic goo barrel to receive a Rat Key. Above the pipe that leads back, there’s also a handle stuck in a pipe—take it.
Head to the Music Box Room. Look at the music box and attach the handle to play it. Say hello to an old friend that’s always nice to meet, and take the screwdriver.
On the same wall, use the Rat Key to open the cabinet and take a film reel.
Turn to the right and you’ll see a wall that’s a grid of pipes. Rotate them until they all connect. The solution looks like this:
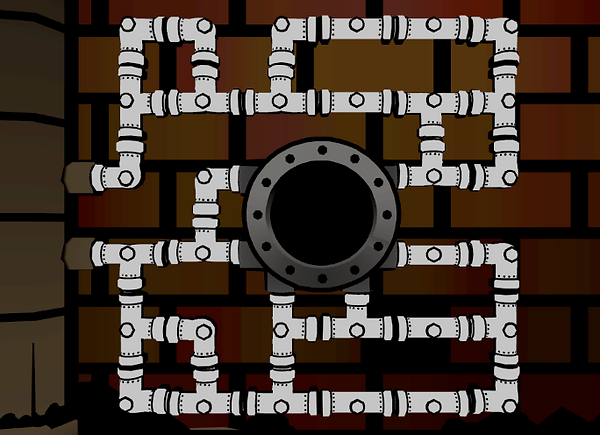
Now you can take an occultist pyramid.
Return to the Central Room and give the film reel to the ghost with the hat. Remember the sequence of symbols it shows you, then head to the Magician’s Room.
Look at the chamber that displays the silhouette of the magician. Enter the symbols in the same order they appeared in the eyes of the ghost who consumed the film reel.
He will sink down, and in his place a leaking pipe will appear. Wonderful. Now look at the column beside you and place the occultist pyramid on it. Three ghosts will emerge and will fart one after the other. Your goal is to remember the order of the farts and press them again in the exact same sequence. If you succeed, you’ll be rewarded with three rolls of toilet paper. Indeed, a definite GOTY moment.
Use the three rolls of toilet paper by stuffing them into the pipe in the magician’s booth. An explosion will occur, revealing this clue.
This clue refers to the grid of numbers you can find in the Music Box Room.
Back in the Magician’s room, use the screwdriver to pull down the big metal board that covers a safe, here you can use the code that can be made from a combination of the two previous hints.
Take the valve and head back to the Music Box Room, Use it in the shaft next to the flowing stream and meet suzie again. Follow her to the Central Room, and there find her and click on her, twice. She will run the Ghost King Room.
She will hide above the ghost king, click on her to make the two struggle. Now light the candle and watch the ghost king dissolve. Take the black heart key and use it to free the black heart rat toy. Granting you with a black heart.
9. The Garden
Pick up the yellow flower.
Turn left and read the note describing the dark church of the Riddlewood family. Spin left again and you’ll see a hungry little flower waiting eagerly for lunch. Click it three times, and… well, say goodbye to this cruel world.
Let’s try again. This time, take the yellow flower, turn around, and don’t touch the carnivorous plant. Instead, collect the black pepper, the rubber band, and the stone from the ground.
Now face the fountain again. Next to it is a gate decorated with purple flowers. To unlock it, click the flowers in order from the one with the fewest petals to the one with the most petals.
Walk through the passage that opened between the plants to reach the area of the ancient ruins.
In the bowl held by the statue of the Archbishop, you’ll find a match—take it. To the left, collect a branch. Click on the Archbishop’s left mustache to tug it and reveal… a soda can. Yes, that’s what just happened, no explanation needed.
Turn to the right, take the red flower, and instead of one of the demon’s statue wings there’s a V-shaped stick that you can take. Below that, you’ll see a slot for three diamonds. For now, leave it. You’ll get back to it later.
Turn right again to find the statue of the Holy Mother. Click her and you’ll notice something seems to bother her. A little black pepper should trigger the sneeze you need. From the ground, collect the handle, then return to the garden.
Use the handle on the door to the tool shed and open it. Inside, you can collect:
-
Pruning shears
-
Shovel
-
Empty watering can
-
Stained glass piece
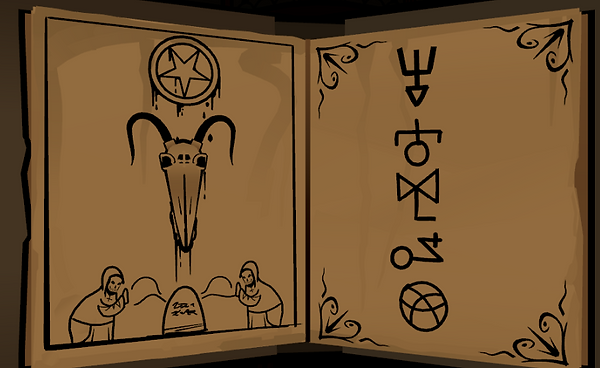
On the shed door, you’ll also find three notes with hints.
Fill the watering can at the fountain. Then look under the bird, there’s a hole in the ground. Insert the branch, place the V-shaped stick on top, stretch the rubber band across, and load the stone. Click again to fire at the bird, then add the dead bird to your inventory.
Turn to the carnivorous plant and feed it the bird. In return, it will spit out a key.
Just above the plant to the right, there’s a clay pot filled with soil. Use the shovel to dig inside and uncover another stained glass piece.
On the right side of the screen, you’ll see a flower bed you can use twice:
-
Water it with the watering can to grow a blue flower.
-
Pour in the soda can to grow a black flower.
By the tomb structure, there’s a bush you can trim with the pruning shears. Doing so rewards you with a purple flower and a third stained glass piece.
Head back to the ancient ruins and look at the wall with the strange mural, a cross combined with the Duck King. In the small niche in the wall, you’ll find another stained glass piece.
Below, there’s a mound of dirt. Use the shovel to dig it up. (This isn’t required to solve the puzzle, it’s just for an optional achievement.) A holy, ancient ghost will emerge and deliver a speech about this place and your only path to salvation: finding the Duck King. A noble goal indeed, but one best left for later in the game.
Now look at the Archbishop statue. Behind him is a slot where you can place the four stained glass pieces you’ve collected. Doing so rewards you with a candle.
Turn to the Holy Mother statue. To the left is a bright climbing plant. Cut it with the pruning shears to reveal a locked cabinet. Use the key you received from the carnivorous plant to open it and collect a brush. Return to the garden.
Next, go back to the garden and examine the tombstone. To its left is a candlestick. Place the candle on it and light it with the match. Use the brush to wipe the dust from Emily’s grave. Clicking on Emily’s grave reveals her birth and death years, and the fact that she died at age 5, a detail you’ll need to remember later.
Click on Emily several times to hear what she has to say. When she finishes, symbols will appear on the surrounding vases, and she’ll ask you to place flowers on her grave.
How do you solve this puzzle? Take a look at the painting of Emily on the open door of the tool shed.

The symbols on the vases are a breakdown of this drawing, and the color of each symbol matches the color of the flower you need to put in each vase.
After placing the flowers in the correct order, smoke will begin to rise from the vases, and Emily will recount the terrible night of her life.
You’ll be transported into a flashback of the event where William, Emily’s father, offered her to his dark master.
Around you are clouds of smoke. Clicking each one reveals a symbol. Your task is to match pairs of identical symbols to clear the clouds. Some symbols look very similar or appear as mirrored versions. Only two that are perfectly identical will count as a match. Start with the obvious pairs, and as the number of clouds decreases, it’ll become easier to spot the trickier ones.
Once you’ve cleared all the clouds and all the candles ignite, click on Emily to witness the inevitable and finally learn what happened to her that night.
Now you’ll find yourself in the Red Room. Look around and experience this moment. Click on Suzie three times to extract three black hearts. Turn around and click on the three toys, then click again to watch them vanish.
Look back at Suzie and take the gold key from her.
You’ll return to the garden. Go to the locked chest in the tool shed and use the gold key to open it. Inside, you’ll find the red diamond.
At this point, you’ve completed the main puzzle of the garden. Now head back to the ancient ruins and look at the demon statue. Beneath it, there’s a slot for three diamonds. If you’ve collected them all, click to unlock the path leading down into the catacomb.
If you don’t yet have all three diamonds, you’ll need to find them in other rooms in the manor. The note pinned to the tool shed explains where to find each one:
-
The green diamond is obtained in the Satellite Room.
-
The blue diamond is found in Margaret’s room (but only if you collected the musical note trophy from the Guest Lounge).
-
The red diamond is obtained here in the Garden.
Once you’ve gathered all three diamonds, return to the ancient ruins, and open the passage into the catacomb.
10. The Catacomb
Welcome to the Catacombs. You’re almost brushing up against pure evil. Ready to stare it in the eye? Here’s how to solve this area.
Start by inspecting the three chairs. To their left there is a book, read it carefully. It contains lore and solutions. Let’s begin with the two skeletons on your right.
The book shows the target arrangement. Slide their bone pieces between columns until both skeletons match the diagram.
Each column holds up to four pieces, so you may need to temporarily dismantle a skeleton to free space to shuffle around other pieces. When you solve it a cage with a black heart toy will emerge.
Now let’s look at the book again and read the sins of no repent
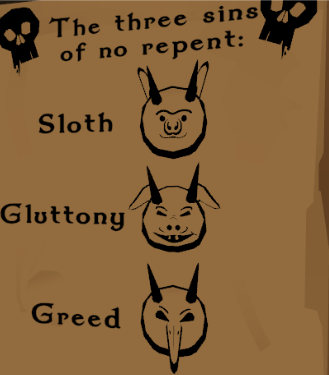
Those are very similar to the three gargoyles on the wall behind you.
-
Sloth - click on the three chairs to pull them out and reveal the items beneath: Night cap, Pillow, Blanket. Give all three to the gargoyle on the left and receive a Horn.
-
Gluttony - Right to the three chairs there’s a Cake, take it and give it to the middle gargoyle.You’ll receive a Dial.
-
Greed - Look at the book again and read it to the back cover. Do you see this pattern?
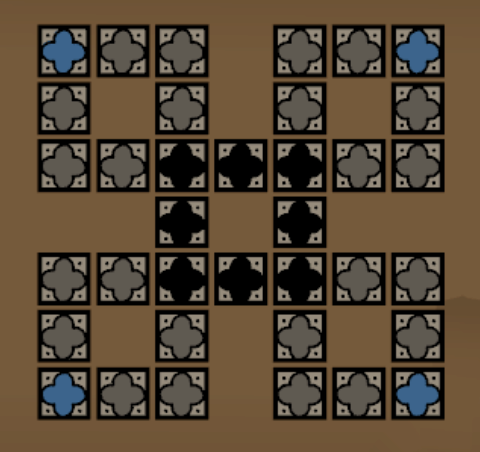
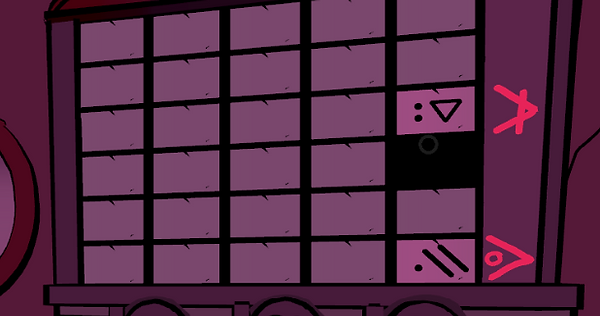
Put down the book and look at the wooden altar in front of you. Clicking in the middle of each big square will move all the tiles, and your job is to recreate the pattern. This one might be a bit harder than you imagine at first. Since when you get close to creating the pattern clicks that can advance you may also ruin another part of the pattern.
One optional strategy here would be to start with placing the blue tiles on the corners first, and then moving the black tiles to the centre.
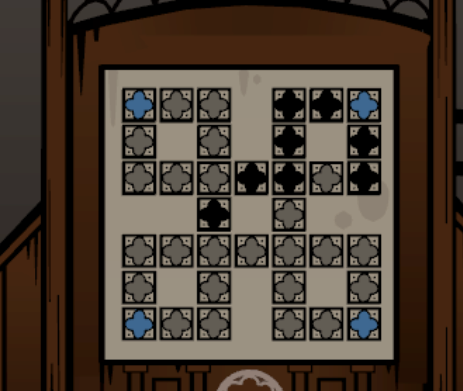
And when moving the black tiles to the centre just make sure you leave a blank one just to place again the last blue tile. You might not get it on the first try, but after playing with it a bit you will get it.

When solving this puzzle you will be rewarded with a coin bag that you’ll need to give to the greedy gargoyle on the right, to receive a second horn.
The next puzzle would be to use the new items you got. Place the dial on the circle above the gargoyles. You can point it to different directions, but what would be the right sequence?
Let’s look again at the book, specifically this page:
Combine the order of symbols here (from top to bottom) with the directions that can be found when you look at a circle that’s found on the wall with the altar made of skulls.
And now you know the right sequence:

You’ll now get a goat skull. Place it on the hook in the middle of the circle of symbols in the skull alter and attach the two horns. Walk into the dark passageway that has been revealed. You will find yourself in a dark catacomb room, made of bones and skulls. Green fire will be lit in a torch, click on it to put it off, and see that another torch is lit. Continue to put off any torch, just remember not to put your guard down while doing so…
When you're finished with this sequence a tomb will be lit. Open the coffin to see an alien mummy boy resting inside. Click on it and receive a black heart key. Head back to the main room and unlock the cage to set the toy free and earn a black heart.
* In case you feel this area still contains more secrets to explore… You are absolutely right. But now you still can not unlock them. It would be wise to get back here after you finish Emily’s story line.
11. Emily's Room
You can only enter Emily’s Room after freeing the three toys and collecting the three black hearts.
🖤 one from the basement
🖤 one from the sewers
🖤 one from the catacomb
Once you have them, the hearts will appear on her door in the Entry Room (Area 2). From that moment, the door opens automatically. If you’re missing any, you’ll need to solve the areas you still didn’t solve.
And If you’re ready… Welcome to Emily’s Room, the “boss” room, with the most complex puzzles in the game. Take a deep breath and let’s dive in.
As a first step, take a moment to look around. Click on different objects, read notes, or the story that’s on the bed. Explore, and get a feel for the room. Not so bad, right?
Now… Why not absentmindedly click on that friendly looking little cabinet?
Uh-oh… Suzie’s not too thrilled about you snooping around Emily’s room. At least she isn’t hungry anymore. But be careful, from now until the end of the puzzle, every time you click that cabinet, Suzie will jump out and kill you, so watch your clicks!
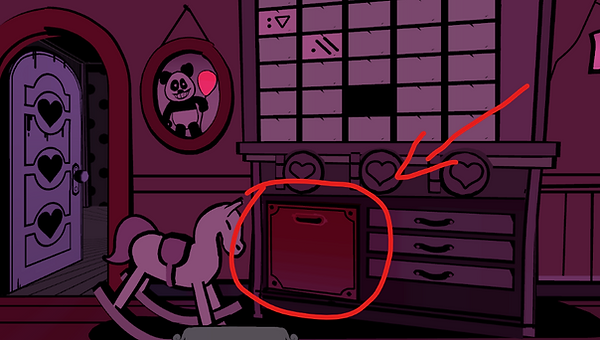
Alright, time to try again. This time, let’s work methodically and solve everything step by step. Open the table and examine the drawing, you’ll see a set of symbols along with a panda illustration.
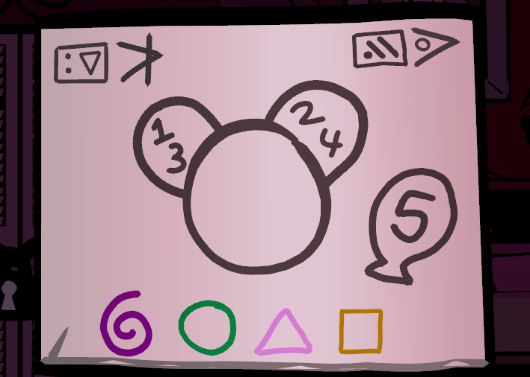
The panda with the balloon corresponds to the panda painting beside the large wardrobe where Suzie hides. Press the panda’s ears and then the balloon in the order shown on the drawing:
Left ear → Right ear → Left ear → Right ear → Balloon
Doing so will reveal some clues on the closet, including a warning from the cabinet where Suzie is hiding.
Move the wooden tiles on the grid to match the tiles with the symbols along with the new symbols on the side of the closet.
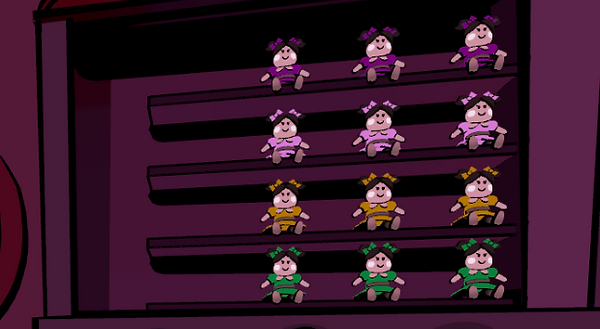
Doing so will reveal lines of dolls. You’ll need to arrange them so the colors of dolls match the symbols under the panda in the drawing. You may need to fiddle around the dolls to make space for them to move, but eventually you’ll need to arrange them in rows of matching colors.
Turn to the wall with the bed and take the glass from next to it, also read the story in the notebook there. Now look at the wall with three toys and take all three toys.
Look back back at the closet, put the glass on the red circle. Each time you move the glass another compartment opens, you’ll need to match a symbol under the glass with a toy, according to the story in Emly’s notebook. House → Bear toy, Car → Rat toy, Trash bin → Baby toy. Inset the toys into the compartment and when you are done open the second drawer to summon Emily’s ghost. She will ask you three riddles. To solve them you’d need to be sure you paid attention so far, because a wrong answer would result in your death. Which won’t necessarily be a bad thing, because that way you will be able to explore other rooms for the right answers. Here are the questions and the answers:
-
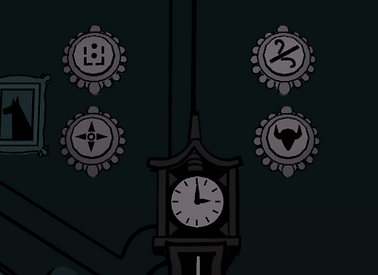
What was the time of Emily’s death? The right answer is 3 as you can see in the clock that is found in the entry room. (There’s also a clock that features the same time in the doll house, if you already entered the doll house)
-
How old was Emily? The right answer is 5, as you can learn from her grave in the garden.
-
How many endings does Emily’s ending have? The right answer is 1, as you can deduce from her tragic backstory and the fact she doesn’t have your ability to come back to life.
-
As a result of solving this you will receive a key and a cookie. Yayy.
Use the key to unlock the closet and move the clothes, and now you can see the ladder that goes to the attic. But before you climb, there’s still plenty a lot to do here in this room.
Click twice on the small trash bin to get two notes, open them and learn about using magic to enter the doll house and about the monkey king. Collect the Cowboy.
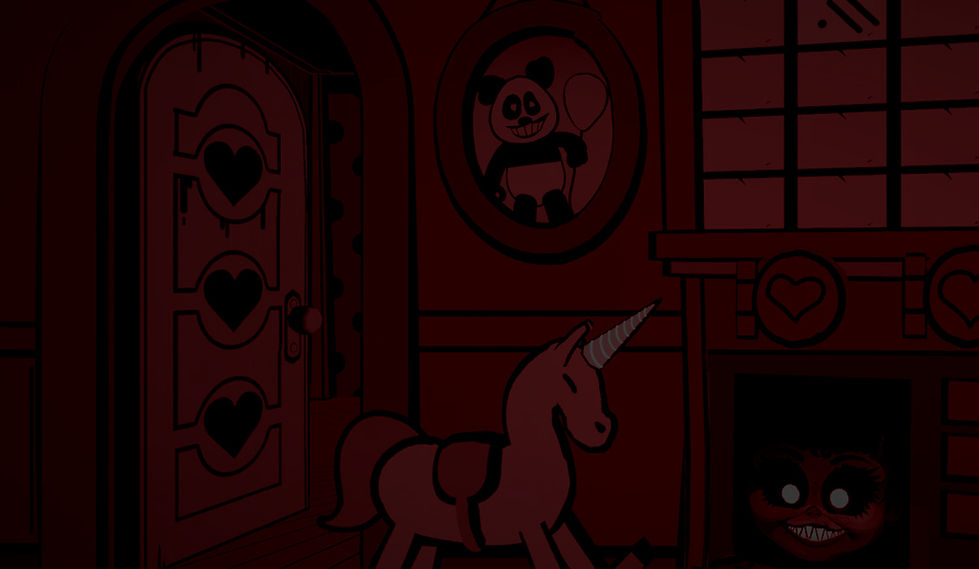
Turn to your left to look at the wall with the bed. Under the bed there’s a pillow, move it and collect the handle. Click on the glass jar to drop it and take the gumball. Turn to the left to the wall with the three black hearts door and take the magical horn from the unicorn.
Turn left, to the wall with the doll house, and click on the bricks to reveal a skull you can take. Use the handle to open the cabinet beneath the doll house and take the crown.
Read the paper that’s on the inside of the cabinet door, note there’s some pattern with this clown and the other clown pictures in the room. Remember that.
Look again at the wall with the head. Place the crown on top of the monkey and give him the gumball. Take the chewed gum.
Face the doll house, left to it there’s a coat rack, place the skull on top of it. Attach the chewed gum to the skull, and stick to it the magic horn. A couple of clicks will teleport you into the doll house.
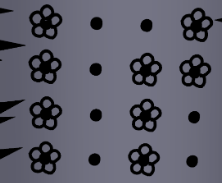
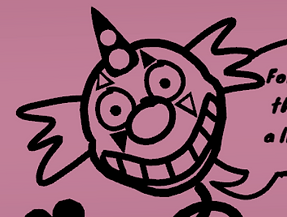
The next puzzle is one that requires info gathered from all around the house. Remember all those mysterious farmers you saw while exploring the different areas? Now, you need to switch frames to match the ones you saw earlier in the different areas.
-
Around the clock in the entry room.
-
Around William in the kitchen.
-
Around the piano in the lounge.
-
And around the mirror in mom’s room.
As you probably learned by now - in Riddlewood Manor you can not go back, death is the only way out. So to solve this you’ll need to go back to the cabinet where Suzie is hiding and let her eat you up, so you can reincarnate in other rooms and gather the clues you need. When you do so you’ll gather these patterns:
In the dollhouse you need to select two symbols to switch their place. Once all the symbols are in the right place they will glow. Do so to all the four walls of symbols and exit the dollhouse.
(Yes, you can also brute force this one out. We won’t stop you from doing it, and you might prefer doing so over dying to go back to other rooms in the manor. but the guide is for proper solution, my good sir)
If all the symbols were aligned correctly, when you exit the dollhouse you’ll see a fire ball spinning in it, click on it to set the house on fire and get a gold key.
Now let’s go up to the attic. Look at the box with the cowboy symbol, put the cowboy there and play the mini game to earn a match. Next to it there’s a box that can be opened with the gold key. Inside the box you’ll find a net, fishing rod, and a second cookie.
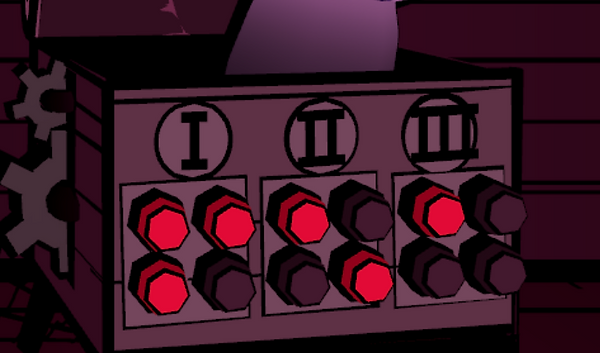
Behind you there’s a box with the logo of the Happy Happy Toys company, the same logo that appeared in the paper downstairs, remember? With the clown. Well, let’s have a look at the three pictures of a clown in the bedroom.
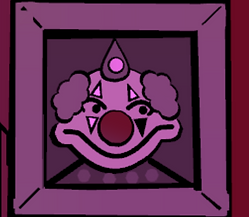
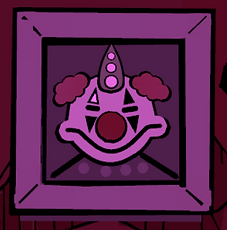
The pattern is made of circles on the hat to indicate the number and and the makeup around the eyes to indicate on\off, Combining it all will create this pattern:
Take the knife, and use it to cut the cartoon box left to the box with the clown. Collect the Match. Now face the meditating dragon. Give it the two Cookies and take the two candles, place them on the candlesticks on his sides and use the matches to light them. Now click many times fast on the dragon to make it evolve. Meet your spiritually evolved guardian angle.
Go back to the bedroom and place the fishing rod on the horse rack, attach the net. Only now you can safely click on the cabinet where Suzie is hiding.
Take trapped Suzie, head back to the attic, and give it to the angel. Also give the knife, and click as fast as you can to help the angle in this struggle.
You’ll be transported to a place outside of space and time. Click on the grave and on the stone disc to further this teleportation…
12. The Beyond
In front of you is a stone arch with a stone disk in its center. Each time you click the disk, the area shifts between summer and winter, changing some of the objects in the room.
Switch to winter and turn around to face the altar with the mammoth skull. Below it, you’ll find a round stone you can take.
Switch back to summer, look in the same direction, and collect the arrowhead. Use the round stone on the stone near the campfire, after a few clicks, you’ll strike a spark that ignites the fire. Collect the stone disk engraved with a cross.
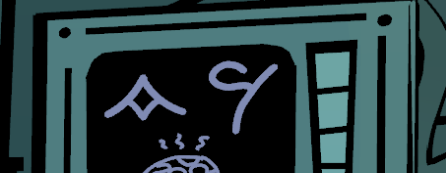
Look at the wall and use the arrowhead to cut the paintings. Remember the code that appears there.
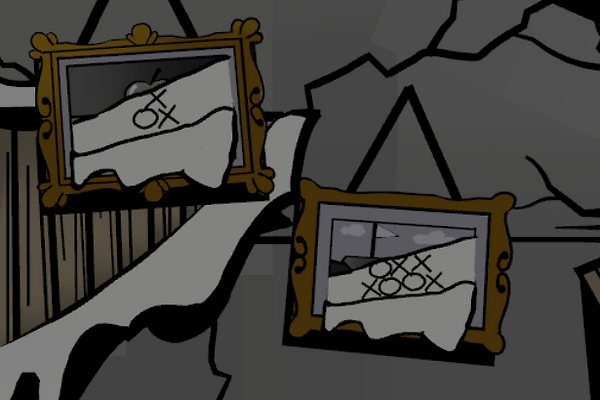
Switch back to winter and look at the wall again. Use the arrowhead once more to cut the paintings, this time, now you will see this code:
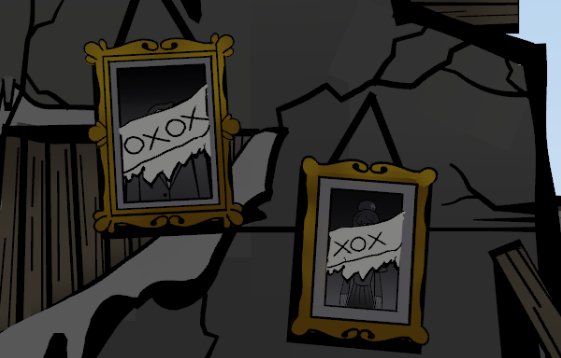
Look at the mammoth altar, the row of stones beneath it is intractable, the stone switches between white and black. Use the code from the wall to create the right pattern.
Hand prints will appear on the altar, also each one of them can switch between two modes. Use the code from the pictures that can be seen in summertime to create the right code.
Take the stone disc and insert both of the discs you collected into the stones next to Emily. The curse is now broken, her tormented soul is finally free.
THE END
...
...
...
...
...
...
...
...
...
...
...
...
...
...
Or is it? You can click on the stone disc to open a portal that will take you back to the manor, to search for more secrets that still lurk there.
13. Hell
Before we explain everything you need to do, it’s worth visiting the catacombs again to see what has changed. Take some time to play around, explore, and investigate.
You’ll meet familiar figures there—Margaret, William, and of course, the chicken. But what do they want to do there?
Read the book again, and perhaps you’ll understand the clues in a new light. Notice this page that makes it clear: to solve the puzzle that takes place here, some preparatory work is required.
It’s also possible to understand that this page hints at a ritual that must be performed—but the items required for it are not yet in your possession.
To overcome this you’ll need to go to the entrance hall. Then go to the room that leads to Emily’s room. It is close now but there’s still what to do. The door with the three black hearts is closed and cannot be opened again. However, clicking the black hearts is possible, they each play a musical note.
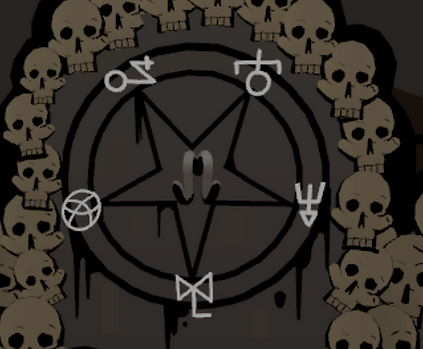
Look at the five hands and press them in a way that forms a pentagram (there’s a hint about this in the book from the Guest Lounge, though you can also reach the solution through careful trial and error). Doing so will give you a note that explains how to obtain the Skull Key.
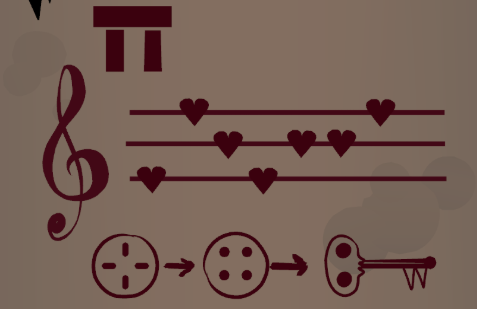
On the note is a melody that you need to reproduce using the black hearts. Once you do, a portal to the World Beyond will open, allowing you to take a stone disk. Turn around and insert the disk into the cabinet. You now have the Skull Key.
From now on, be mindful of where you walk, avoid wandering into rooms that don’t have a return path, or you’ll have to redo certain tasks.
Head to the Guest Lounge, then continue to the Garden. Stop by the tool shed and take the pruning shears (and if you feel like hunting for achievements in Hell, grab the shovel too).
Only after you’ve collected the items from the Garden, go down to the Catacomb.
There, enter the dark room made of skulls and use the Skull Key to unlock the cabinet. Inside, take the staff and the bowl. Use the pruning shears to cut the string from the weight and collect a match.
Return to the central room and pick up an empty cup. Place it in the coffee machine, fill it with coffee, and give it to Margaret. Collect the incense, now everything is ready for the ritual. Follow the sequence of steps as described in the book.
Give William the staff, then the bowl. Place the incense inside the bowl, use the match to light it, and click on the chicken to spread the smoke around.
You’ll now be surrounded by clouds, click them to match symbols, in a memory-game style puzzle, similar to the cruel ritual that sealed Emily’s fate. Once you’ve solved it, click William again.
And this is the time to abandon all hope…
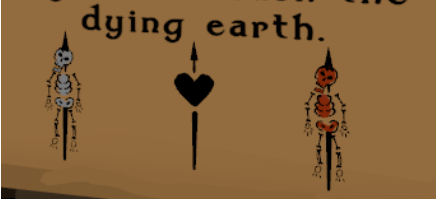
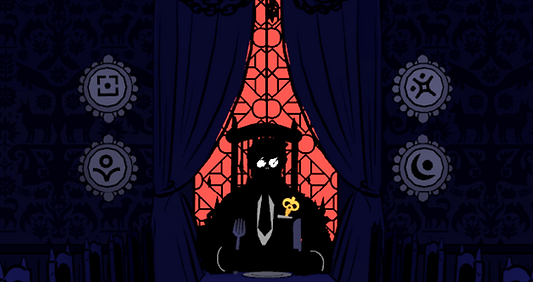
You’re now in a place from which there is no turning back. Look at the three skeletal monks and click on them one by one, from left to right, until they chant “Welcome to Hell.” Collect the unholy egg they hand you.
Open the gate and head up to the house. Near the door, you’ll find a cow’s tail, take it and return to the monks. There you’ll find a monstrous cow. Give her back her tail. Her udders will swell, click them, and one of her heads will swell as well. Keep clicking each time a head swells until she vomits a miserable creature onto the ground. Pick it up.
Go back up the path to the house, turn right, and you’ll see a mournful face in the ground. Click it to collect the harvest.
Turn back to the wooden crate, place the harvest inside, then put the cursed egg on top. Click again, and a demon will hatch. Give him the miserable creature as breakfast, he’ll gladly eat it and then poop out a doorbell button.
Take it and attach it to the doorbell next to the house door. Ring it to finally meet the Dark Monkey King. But none of you expected to see Suzie, who’s standing right behind you. She wants her revenge.